Ghidra 是 NSA 开源的逆向分析平台,适合做静态分析、反汇编、反编译、交叉引用、结构恢复、符号整理和脚本自动化。
如果把动态调试看成“运行时抓现场”,Ghidra 更像“把程序摊开,慢慢做地图”。它不要求目标程序正在运行,适合先把函数、字符串、导入表和调用链梳理清楚。
适合场景
| 场景 | 说明 |
|---|---|
| 反编译 C/C++ 程序 | 查看接近 C 语言的伪代码 |
| 分析 Windows / Linux / Android Native | PE、ELF、Mach-O、so、dll 都常用 |
| 固件分析 | 配合 binwalk、strings、交叉引用理解固件逻辑 |
| 查找关键字符串 | 从日志、错误提示、URL、命令字反推函数 |
| 恢复结构体 | 根据字段访问恢复数据结构 |
| 批量分析 | 使用 Headless Analyzer 和脚本跑自动化任务 |
Ghidra 不太适合直接替代运行时 Hook。遇到参数真实值、加密输入输出、运行时对象状态,通常要配合 Frida、lldb、gdb 或日志。
基础工作流
1 | 创建项目 |
开始前建议记录样本信息:
1 | file sample.bin |
记录模板:
1 | ## 样本 |
导入样本
打开 Ghidra 后:
File -> New Project创建项目。- 选择
Non-Shared Project。 File -> Import File导入样本。- 确认格式、架构和编译器。
- 双击样本打开 CodeBrowser。
- 弹出分析提示时选择
Yes。
自动分析选项一般可以保持默认。遇到大型二进制或固件时,可以先减少分析项,避免等待太久。
常见自动分析项:
| 分析项 | 作用 |
|---|---|
| Disassemble Entry Points | 从入口点开始反汇编 |
| Function ID | 匹配常见库函数 |
| Decompiler Parameter ID | 帮助恢复参数 |
| ASCII Strings | 扫描字符串 |
| Reference | 建立交叉引用 |
界面常用窗口
| 窗口 | 用途 |
|---|---|
| Listing | 反汇编主视图 |
| Decompiler | 伪代码视图 |
| Symbol Tree | 函数、标签、导入导出 |
| Data Type Manager | 结构体、枚举、类型 |
| Defined Strings | 字符串列表 |
| Function Call Graph | 函数调用图 |
| Console | 脚本输出和错误 |
常用快捷键:
| 快捷键 | 用途 |
|---|---|
G |
跳转地址或符号 |
L |
修改标签名 |
F |
创建函数 |
D |
转为数据 |
C |
转为代码 |
X |
查看交叉引用 |
Ctrl + L |
重命名函数或变量 |
; |
添加注释 |
从字符串开始分析
很多程序会留下错误提示、URL、日志标签、命令字:
- 打开
Window -> Defined Strings。 - 搜索关键字,例如
login、token、error、sign。 - 双击字符串。
- 按
X查看引用。 - 进入引用函数。
- 在 Decompiler 里阅读伪代码。
例子:
1 | "invalid token" |
给函数改名:
1 | FUN_00123456 -> check_token_and_build_error |
命名不需要一步到位。可以先用粗糙名字:
maybe_check_tokenbuild_login_requestparse_config_jsondecrypt_buffer
随着证据增加再修正。
从导入函数开始分析
导入表能告诉你程序可能做什么:
| 导入函数 | 可能行为 |
|---|---|
connect / send / recv |
网络通信 |
open / read / write |
文件读写 |
dlopen / dlsym |
动态加载 |
EVP_EncryptUpdate |
OpenSSL 加密 |
CreateFileW |
Windows 文件访问 |
RegOpenKeyExW |
Windows 注册表 |
在 Symbol Tree 里找 Imports,选择函数后按 X 看哪里调用。
如果看到:
1 | send(socket_fd, buffer, length, 0); |
继续追 buffer 的来源,通常能找到协议组包、加密或序列化逻辑。
反编译视图阅读方法
Ghidra 反编译结果不是源码,只是推测。阅读时关注:
- 函数参数。
- 返回值。
- 条件分支。
- 字符串引用。
- 外部 API。
- 内存读写偏移。
- 循环和数组。
看到这种伪代码:
1 | if (*(int *)(param_1 + 0x10) == 0) { |
可以推测 param_1 是结构体指针,0x10 是某个字段。
后续可以建立结构体:
1 | struct session { |
然后把 param_1 类型改成 session *,伪代码会更可读。
恢复结构体
当你看到大量固定偏移访问:
1 | *(int *)(ctx + 0x8) |
可以创建结构体:
- 打开
Data Type Manager。 - 右键项目,
New -> Structure。 - 命名
app_context。 - 添加字段。
示例结构:
1 | struct app_context { |
在 Decompiler 里右键变量,选择 Retype Variable,改成:
1 | app_context * |
改完后伪代码可能变成:
1 | if (ctx->fd < 0) { |
这种恢复比单纯看 param_1 + 0x10 清楚很多。
函数签名修正
Ghidra 猜参数不一定准。看到函数实际被这样调用:
1 | ret = FUN_00102030(buffer, length, key); |
可以重命名并改签名:
1 | int decrypt_buffer(uint8_t *buffer, size_t length, uint8_t *key); |
操作:
- 在函数名上右键。
Edit Function Signature。- 修改返回值、函数名、参数类型。
签名改对后,调用方也会更清楚。
Patch 与导出
Ghidra 可以 patch 指令,但要谨慎。常见用途是学习验证,而不是直接改发布文件。
修改指令:
- 在 Listing 里选中指令。
- 右键
Patch Instruction。 - 输入新汇编。
例如把条件跳转改成无条件跳转:
1 | JZ 0x401000 |
改成:
1 | JMP 0x401000 |
导出:
1 | File -> Export Program |
注意:复杂二进制 patch 后可能涉及校验、签名、重定位、代码段权限等问题。学习分析时更建议记录 patch 思路,而不是把 patch 当最终方案。
Headless Analyzer
批量分析时可以用命令行:
1 | analyzeHeadless /tmp/ghidra-project demo \ |
参数说明:
| 参数 | 说明 |
|---|---|
/tmp/ghidra-project |
项目目录 |
demo |
项目名 |
-import |
导入文件 |
-postScript |
分析后执行脚本 |
-deleteProject |
执行完删除项目 |
适合批量提取字符串、导入函数、导出函数、函数列表。
Ghidra 脚本:列出函数
Ghidra 脚本可以用 Java 或 Python。这里用 Python 风格示例。
1 | #@category Examples |
运行:
1 | Window -> Script Manager -> New Script -> Python |
保存后点击运行,输出在 Console。
脚本:搜索字符串引用
1 | #@category Examples |
这个脚本适合快速找关键字符串及其引用地址。
脚本:导出函数和调用关系
1 | #@category Examples |
可以把输出保存成文本,作为后续画调用图的素材。
小案例:定位配置解析函数
假设目标程序会读取配置文件 config.json。
分析路线:
- 在
Defined Strings搜索config.json。 - 按
X查看引用。 - 进入引用函数,重命名为
load_config_file。 - 找到
fopen、read或json_parse调用。 - 顺着返回值找使用配置字段的函数。
可能看到的伪代码:
1 | fp = fopen("config.json", "rb"); |
命名建议:
1 | FUN_00101020 -> load_config_file |
记录时写清证据:
1 | - `load_config_file` 引用字符串 `config.json`。 |
常见问题
反编译结果很乱
可能原因:
- 函数边界识别错。
- 编译器优化强。
- 混淆或控制流平坦化。
- 目标是 C++,模板和虚函数较多。
- 架构或语言选择不对。
处理方式:
- 手动创建函数。
- 修正函数签名。
- 从字符串和导入 API 分析,不硬读全函数。
- 先命名小函数,再慢慢扩展。
字符串找不到
可能原因:
- 字符串被加密。
- 字符串是 UTF-16。
- 字符串运行时拼接。
- Ghidra 没扫描到数据区域。
处理方式:
- 调整字符串扫描选项。
- 搜索宽字符。
- 用动态工具观察解密后的内存。
- 找解密函数,而不是只找明文。
函数名全是 FUN_
这是正常的。没有符号表时,Ghidra 只能按地址命名。逆向的重要工作之一就是根据证据重命名。
命名建议:
1 | FUN_00102030 -> maybe_decrypt |
变量类型不对
右键变量,选择 Retype Variable。如果结构体字段还不明确,先用 undefined8、void *、char * 过渡。
跳转地址无法反汇编
可能是:
- 目标区域不是代码。
- 间接跳转表。
- 混淆制造的异常控制流。
- 架构模式不对,例如 ARM / Thumb。
可以手动按 C 转代码,或检查语言模式。
完整案例:从 invalid token 定位登录校验链路
这个案例假设你拿到一个授权测试样本 demo-login,运行时登录失败会打印 invalid token。目标不是改掉校验,而是搞清楚 token 在哪里读取、怎么校验、失败分支怎么返回。
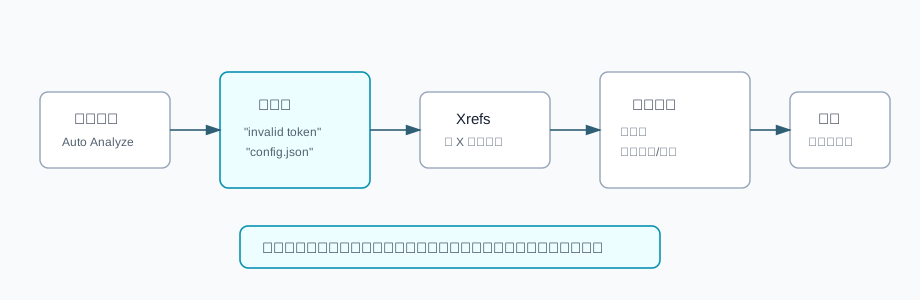
1. 记录样本信息
1 | file demo-login |
记录:
1 | - 文件:demo-login |
2. 从字符串找引用
导入 Ghidra 并自动分析后,打开 Defined Strings,搜索:
1 | invalid token |
假设结果是:
1 | 00406210 invalid token |
双击字符串,按 X 查看引用:
1 | XREF[1]: FUN_00101430:001014a8(*) |
进入 FUN_00101430。
3. 阅读伪代码并命名
可能看到:
1 | int FUN_00101430(char *param_1) |
第一轮命名不要太绝对:
1 | FUN_00101430 -> login_check_and_print_result |
继续进入 maybe_read_token_from_config。如果看到:
1 | fp = fopen("config.json", "rb"); |
就可以把它改成:
1 | maybe_read_token_from_config -> read_config_file |
4. 修正函数签名
原始签名可能是:
1 | undefined8 FUN_001011e0(undefined8 param_1, int param_2) |
根据调用和内部行为,改成:
1 | int read_config_file(char *out, int out_size) |
改完后调用方更清楚:
1 | read_config_file(local_88, 0x80); |
5. 分析校验函数
进入 maybe_verify_token,假设看到:
1 | int FUN_00101320(char *input, char *token) |
结合 strcmp 和前置函数,命名为:
1 | FUN_00101080 -> build_expected_token |
如果 build_expected_token 里出现 SHA256、HMAC、base64 或相关导入,再继续命名成更具体的算法函数。
6. 动态验证
静态分析得到函数偏移后,可以用调试器验证真实参数。Linux x86_64 下前两个参数通常在 rdi、rsi:
1 | b *0x00101320 |
如果是 Android Native,可以把偏移拿给 Frida:
1 | const base = Module.findBaseAddress('libdemo.so'); |
7. 复盘记录
1 | ## 登录校验链路 |
这个案例的核心是建立证据链:字符串只是入口,交叉引用带你找到分支,函数命名和签名修正让链路逐步清楚,最后用动态调试确认参数。
分析习惯
- 每找到一个函数,先写一句“它为什么是这个功能”。
- 只给有证据的函数命名。
- 不确定就用
maybe_前缀。 - 结构体字段先按偏移命名,如
field_10。 - 每次改类型前先看调用方是否也受影响。
- 静态结论最好用动态运行验证一次。
复盘模板
1 | ## 目标 |
案例二:从 license expired 找到授权校验逻辑
样本代码
用一个自有测试程序模拟授权校验:
1 |
|
编译:
1 | gcc -O0 -g license.c -o license |
1. 导入后先找字符串
Ghidra 里打开 Window -> Defined Strings,搜索:
1 | license expired |
双击字符串后按 X 看引用,通常会跳到某个函数里的 puts 调用附近。
2. 给函数命名
看到伪代码类似:
1 | iVar1 = FUN_00101169(param_1); |
这时可以做两件事:
- 把当前函数命名为
check_license。 - 把
FUN_00101169命名为parse_expire_day。
3. 修正函数签名
右键函数名,选择 Edit Function Signature:
1 | int check_license(char *license) |
进入 parse_expire_day,签名改成:
1 | int parse_expire_day(char *license) |
签名修正后,调用处伪代码会明显好读。
4. 标记关键常量
20260531 是授权过期判断的阈值。可以在反编译窗口里给它加注释:
1 | hardcoded_min_valid_day |
如果同一个常量在多个函数出现,用 Search -> For Scalars 搜:
1 | 20260531 |
5. 写结论
1 | ## 授权校验结论 |
这个案例里,Ghidra 的价值是把“字符串附近的一段汇编”整理成“输入、解析、比较、输出”的业务链路。
案例三:恢复一个 C 结构体
样本代码
1 |
|
编译:
1 | gcc -O0 -g -c device.c -o device.o |
1. 看伪代码里的偏移
未恢复结构体时,伪代码可能是:
1 | if (*(short *)(param_1 + 4) != 1) { |
这已经能推字段:
| 偏移 | 访问方式 | 推断 |
|---|---|---|
+0 |
undefined4 |
uint32_t id |
+4 |
short |
uint16_t status |
+6 |
ushort & 4 |
uint16_t flags |
+8 |
%s |
char name[] |
2. 新建结构体
打开 Data Type Manager,新建结构体:
1 | struct Device { |
3. 应用到函数参数
把函数签名从:
1 | undefined4 FUN_00101000(long param_1) |
改成:
1 | int is_device_ready(Device *dev) |
伪代码会变成:
1 | if (dev->status != 1) { |
4. 复盘写法
1 | ## Device 结构体恢复 |
结构体恢复的重点不是猜名字,而是用访问宽度、格式化字符串、比较常量和调用参数做证据。
案例四:用 Ghidra Script 批量找可疑危险函数
目标
在一个固件或命令行程序里批量找 strcpy、sprintf、system 的调用点,并输出调用函数地址。
脚本
在 Script Manager 新建 Python 脚本:
1 | # Finds calls to selected imported functions. |
输出示例
1 | strcpy called at 0010142a in parse_config |
下一步分析
对每一条结果继续看:
- 参数是否来自用户输入、网络、配置文件。
- 目标缓冲区大小是否固定。
- 是否有长度限制。
- 是否存在命令拼接。
记录模板:
1 | | 函数 | 调用点 | 参数来源 | 初步风险 | |